How to Share an External Drive Between a Mac and a PC
Want to use a single external drive with both a Mac and a Windows PC? Follow our guide to learn how to do it.
 Looking
to share an external hard drive between a Mac and PC? The best way to
do it is with a drive formatted as FAT32. Though this format has some
limitations, it enjoys nearly universal support from active platforms,
including Mac and Windows operating systems, and many gaming and Linux
OSs.
Looking
to share an external hard drive between a Mac and PC? The best way to
do it is with a drive formatted as FAT32. Though this format has some
limitations, it enjoys nearly universal support from active platforms,
including Mac and Windows operating systems, and many gaming and Linux
OSs.The chief drawbacks of FAT32 involve file and partition size limitations. FAT32 imposes a size limit of 4GB on single files. So if you work with bulky video clips, for example, adopting FAT32 may not be a good idea. When formatting partitions, Windows 7's Disk Management utility won't let you create one that's larger than 32GB, whereas Mac OS X Lion can create partitions as large as 2TB using its Disk Utility application. Finally, Mac OS X's Time Machine backup utility won't work with FAT32.
Windows prefers to use NTFS (which stands for New Technology File System, though it has been around for nearly 20 years now). Macs running Snow Leopard or Lion can read from drives formatted as NTFS, but they can't write to such drives unless you install a third-party driver or muck about in the Terminal. Conversely, Windows 7 can't read and write to drives formatted as HFS+--also known as Mac OS Extended (journaled)--unless you install third-party software such as Paragon's.
Formatting From a Mac
To format a drive as FAT32 from a Mac, follow these simple steps.1. Set up your drive following the manufacturer's instructions. Connect the power supply (if necessary), connect to the Mac via USB or FireWire, and turn on the drive. The drive should automatically mount on your Mac's desktop (if the finder preferences are set to show external drives). If the drive is not formatted, you may get a message saying that the drive is unreadable by Mac OS X and asking you whether you want to format it via Disk Utility. We're going to do this anyway, so open Disk Utility from the prompt or by navigating to /Applications/Utilities.
 Select MS-DOS (FAT) as the format.
2. Mac OS X won't let you create a FAT32 partition larger than 2TB; so if your drive is larger than that, you'll need to divide the available drive capacity into multiple partitions. You can format the remaining space as a second FAT32 partition or as an HFS+ partition, or you can leave it as unallocated space. To create a new partition, click the drive in the list on the left side of the Disk Utility menu. Click the Partition button in Disk Utility's main window. By default, Mac OS X will use the GUID partition table to format the drive. You can use this and still share FAT32 volumes with a PC, but if you'll primarily be using the drive with Windows, and if the full capacity of the drive doesn't exceed 2TB, the wiser course is to wipe the drive and then use Windows' Master Boot Record (MBR) partition scheme.
 Establishing the partition layout.
3. Click the Partition Layout drop-down menu in Disk Utility, and select the number of partitions you want to create. By default, Disk Utility will divide the available space in half. You can resize the partitions by clicking the line between the partitions and dragging it up or down to increase or decrease the capacity of one or the other side.
4. Click on whichever partition segment you want to format as FAT32. Type a name for that partition in the Name field and choose the FAT32 option from the Format drop-down menu. Once everything is arranged as you want it, click apply. A progress bar will appear at the bottom right of the window as Disk Utility creates the requested partitions. Once it finishes creating them, you can move the drive between Macs and Windows PCs, and move files back and forth easily.
Formatting From a PC
 Select your hard drive, and choose 'Convert to MBR Disk'.Here's how to create a FAT32 partition from a Windows 7 PC.
1. Open the Disk Management utility. To do so, select Start, Control Panel, System and Security, Create and format hard disk partitions. Alternatively, press the Start button and start typing partitions.
2. Find the drive you'd like to format; in my case, it was Disk 5. Click the disk number, and select Convert to MBR Disk ("MBR" stands for "Master Boot Record"). Right-click the unallocated segment in the next field over, select New Simple Volume, and click Next when the wizard launches. Change the value in the Simple Volume size field to 32,768MB or less--it needs to be under 32GB, to satisfy the format's file limit. Assign a drive letter, and click Next.
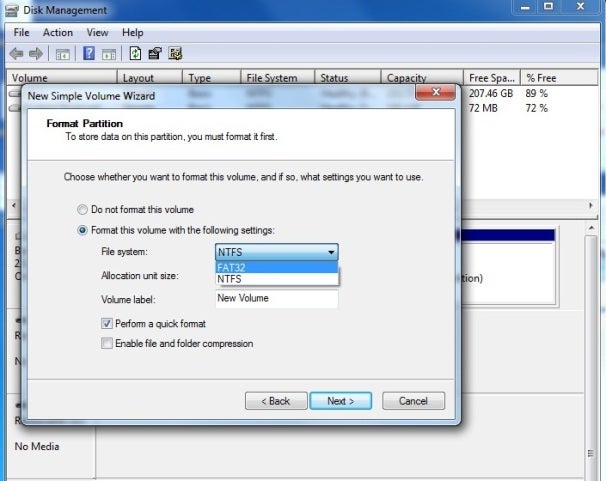 Formatting the partition.
3. Choose the drive letter to be assigned and click Next. Select FAT32 from the File System drop down menu, label the volume however you like, check the box next to Perform a quick format, and click Next. The resulting window tells you that you have successfully completed creating the volume. Click Finish and you're ready to go.
